The objective of this article (Part-1) is to introduce you with Microsoft Windows PowerShell.
Table of Contents
- Introduction
- Features of PowerShell
- Common uses of PowerShell
- Begin to learn Windows PowerShell
How to run your first PowerShell script
o Variable declaration
o Arrays
o Associative Arrays
o Loops
For statement
Foreach statement
While statement
0 Operators in Windows PowerShell
o The logical operator table
o The comparision operators table
o If,else statement
Logical “and”
Logical “or”
Logical “not”
Logical “not equal”
* Functions or methods
* Commands
- VB Script to PowerShell (Part-2)
- Work with various objects (Part-3)
- Work with .Net library (Part-4)
- Point of Interest
- References
- Conclusion
- History
Introduction
The objective of this article (Part-1) is to introduce you with Microsoft Microsoft Windows PowerShell, We will learn some basic of windows PowerShell, For example: how to write your first PowerShell script, how to use Microsoft .Net library in your PowerShell script and some other stuff as well.
So, let’s start, at first we need to know what is Windows PowerShell? The answer is very simple,
PowerShell is a programming language like other programming language. The PowerShell language is similar to Perl. This is important that the PowerShell is an object-oriented language and interactive command line shell for Microsoft Windows Platforms.
Features of PowerShell
One of the great features of PowerShell is the integration with the Microsoft .Net environment & also can be implanted within other applications. Microsoft Windows PowerShell was specially design to automate system task and create system management tools for commonly implemented process.
The Microsoft windows PowerShell provides a number of ways to automate job, including:
* Cmdlets, which are very small .NET classes that appear as system commands.
* Scripts, which are combinations of cmdlets and associated logic.
* Executables, which are standalone tools.
* Instantiation of standard .NET classes.
For more information can be found from the links are listed below:
* Windows PowerShell Features from Microsoft.
* PowerShell Means “Powerful Automation”.
Common uses of PowerShell
As we know PowerShell is an object-oriented language & allow using Microsoft .Net library, So
we can use the PowerShell script in quite a lot of ways; some of the common uses are listed below:
* Windows Active Directory.
* Document management / File processing.
* Network monitor.
* Working with Xml.
* Working with Microsoft Office system.
* Etc.
How to run your first PowerShell script
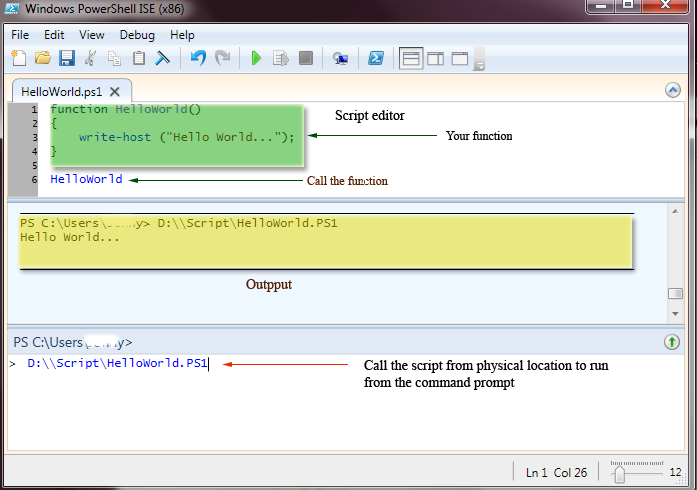
This is important that don’t compare PowerShell script is like as VB script, we know the we can run vb script by double clicking the *.vbs file or from batch file. The PowerShell script can be run from the power shell command prompt or you can also run the script from windows batch file with the valid command. The figure below show how to write a script & run as well.
Figure- A (Windows PowerShell ISE- editor)
Note: Windows 7 platform.
Begin to learn
Well, I hope that you dig up some basic information of windows PowerShell. So let’s start:
In this section we will learn the basic for writing PowerShell Script, such as variable declaration,
assign values and play with the variables, create & access object from Microsoft .Net library etc.
Variable declaration
All the variable in PowerShell script begin with the $ sign. For example, we want to add two integer value and assign to another variable, the script will like
Example:
Collapse
[int]$valA = 2;
[int]$valB = 3;
[int]$valC = 0;
$valC = $valA + $valB;
write-host (“The sum is: ” + $valC);
write-host (“The sum is: $valC “);
Output: The sum is: 5*write-host -> command for write output.
Note: PowerShell allow reading value from a variable from double quotes string and also you can declare a variable without data type i.e., $valA = 0; as we do in vbScript isn’t cool.
Arrays
An array is a data structure for storing a collection of data elements of the same type. Windows PowerShell supports data elements, such as string, int (32-bit integer), long (64-bit integer), bool (boolean), byte, and other .NET object types. For example we want to create an integer array and assign values and finally we will display the sum of all the values in the array. The script will be like:
Example:
Create an array named $myArray that contains the ten numeric (int) values:1,2,3,4,5,6,7,8,9,10;
Collapse
$myArray = 1,2,3,4,5,6,7,8,9,10;
[int] $sum = 0;
foreach ($val in $myArray)
{
write-host (“Index with value:$val”);
$sum = $sum + $val;
}
write-host (“The sum is: $sum”);
Output:
Index contain value:1
Index contain value:2
Index contain value:3
Index contain value:4
Index contain value:5
Index contain value:6
Index contain value:7
Index contain value:8
Index contain value:9
Index contain value:10
The sum is: 55
Associative Arrays
PowerShell allow you to work with associative array / array list as like as we do in C#.Net or other available language in Microsoft Visual Studio .Net. An associative array is a compact data structure for storing a collection of keys and values where each key is paired with a value. PowerShell uses the hash table data type for storing the contents of an associative array because this data structure provides a fast lookup mechanism. For example, we want to create an associative array of countries and assign some value and finally lookup values. The script will be like:
Example:Declaration syntax:
$ = @{;…}
Collapse
$countries = @{’88’ = ‘Bangladesh’; ’44’ = ‘United Kingdom’; ’11’ = ‘United States’; ‘1’ = ‘Canada’};
$countries ;
Output:
Name Value
——- ——————-
44 United Kingdom
11 United States
1 Canada
88 Bangladesh
So it is very similar to create and initialize a standard array. However, for an associative array, you must also do the following:
* Assign a label to each value in the associative array.
* Append an @ sign to the outside of the array contents.
* Surround any keys or values that contain spaces with single or double quotes.
Loops
In a loop structure, a computer program that performs a series of instructions repeatedly until some specified condition is satisfied.
For statement
The for statement (also known as a for loop) is a language construct for creating a loop that runs commands in a command block while a specified condition evaluates to true.
A typical use of the for loop is to iterate an array of values and operate on a subset of these values. In most cases, if you want to iterate all values in an array, consider using a foreach statement.
The following shows the for statement syntax:
for (; ; )
{}
For example, the following for statement will continually display the value of the $i variable until you manually break out of the command by pressing Ctrl+C.
Collapse
for ($i=0; $i<10;$i++)
{Write-Host $i}
Collapse
$i = 1
for (;;){Write-Host $i}
Foreach statement
The foreach statement (also known as a foreach loop) is a language construct for stepping through (iterating) a series of values in a collection of items.
The simplest and most typical type of collection to traverse is an array. Within a foreach loop it’s common to run one or more commands against each item in an array.
The following shows the foreach syntax:
foreach ($ in $
){}
For example, the foreach loop in the following example displays the values in an array named $letterArray:
Collapse
$letterArray = “a”,”b”,”c”,”d”
foreach ($letter in $letterArray)
{
Write-Host $letter
}
In this example, the $letterArray is created and initialized with the string values “a”, “b”, “c” and “d”. Then, the first time the foreach statement runs, it sets the $letter variable equal to the first item in $letterArray (“a”), and then uses the Write-Host Cmdlet to display the letter a. The next time through the loop, $letter is set to “b”, and so on. After the foreach loop displays the letter d PowerShell exits the loop.
Note that the entire foreach statement must appear on a single line to run it as a command at the PowerShell command prompt. This is not the case if you place the command in a .ps1 script file instead.
While statement
The while statement (also known as a while loop) is a language construct for creating a loop that runs commands in a command block as long as a conditional test evaluates to true. The while statement is easier to construct than a for statement because its syntax is less complicated. In addition, it’s more flexible than the foreach statement because you specify a conditional test in the while statement to control how many times the loop runs.
The following shows the while statement syntax:
while (){}
When you run a while statement, the Windows PowerShell evaluates the section of the statement before entering the section. The condition portion of the statement resolves to either true or false. As long as the condition remains true, PowerShell reruns the section.
The } section of the statement contains one or more commands that are run each time the loop is entered or repeated.
For example, the following while statement displays the numbers 1 through 3 if the $val variable has not been created or has been created and initialized to 0.
Collapse
while($val -ne 3)
{
$val++
Write-Host $val
}
In this example, the condition ($val is not equal to 3) is true while $val = 0, 1, 2. Each time through the loop, $val is incremented by 1 using the ++ unary increment operator ($val++). The last time through the loop, $val = 3. When $val equals 3 the condition statement evaluates to false and the loop exits.


Leave a comment